This morning Bob (from Canadian sailing vessel Meredith) and I filled our American-style propane tanks at M.C. Trans on 98 Zagrebacka Ulica in Zadar. It was a short cab ride from the old town. Total cost for return trip and two 7 kg. tanks to be filled: 300 kunas.
We are anchored nicely in U. Maestrala just north of the main harbour in Zadar - no charge and loving it.

Friday, 12 July 2013
Sunday, 30 June 2013
Bug Screen Weatherboard
On H2OBO, we have a large companion way that provides good access to the interior and airflow. Unfortunately, mosquitoes agree. So we devised a bug screen that replaces our weatherboards that is collapsible and works well when we want to feel the breeze and keep the bugs out.
The materials needed include wood doweling, heavy outdoor material (like Sunbrella), durable screen material (like Phifertex), a sewing machine, a couple of inches of Velcro, and some scrap 3-strand rope. The idea behind the construction is to use the dowels within fabric sleeves to make the screen rigid and fit exactly within your companionway. The dowel thickness, including the material contained in the sleeve, should fit in the groove that holds the weatherboards. The horizontal dowels are permanently sewn into the sleeves and the vertical ones are removable. To make them removable, I made the vertical sleeves a couple of inches longer and use the Velcro to lock them down once they are folded over the dowel to hold them in.
The sleeves are eight inches wide and cut to the appropriate length on each side of the opening. It can be a little tricky sewing the sleeves into a frame, but take your time and use plenty of straight pins to get the angles right. Also, be sure to make the tubes holding the dowels as tight as possible to ensure a rigid frame. Do this by keeping the sewing foot up against the dowel when sewing the tube.
Our screen butts up against the companionway hatch and leaves a little gap that bugs could still get through, so I sewed a "baggy winkle" along the top to stop the pest. A baggy winkle is essentially a length of rope with short lengths of frayed rope woven along its length. This was originally used by seamen to provide chafe protection on-board a ship.
We are now sleeping soundly without that nagging buzzing sound around our ears at night.
Branko
The materials needed include wood doweling, heavy outdoor material (like Sunbrella), durable screen material (like Phifertex), a sewing machine, a couple of inches of Velcro, and some scrap 3-strand rope. The idea behind the construction is to use the dowels within fabric sleeves to make the screen rigid and fit exactly within your companionway. The dowel thickness, including the material contained in the sleeve, should fit in the groove that holds the weatherboards. The horizontal dowels are permanently sewn into the sleeves and the vertical ones are removable. To make them removable, I made the vertical sleeves a couple of inches longer and use the Velcro to lock them down once they are folded over the dowel to hold them in.
 |
| Fold-over on the sleeve with Velcro |
The sleeves are eight inches wide and cut to the appropriate length on each side of the opening. It can be a little tricky sewing the sleeves into a frame, but take your time and use plenty of straight pins to get the angles right. Also, be sure to make the tubes holding the dowels as tight as possible to ensure a rigid frame. Do this by keeping the sewing foot up against the dowel when sewing the tube.
Our screen butts up against the companionway hatch and leaves a little gap that bugs could still get through, so I sewed a "baggy winkle" along the top to stop the pest. A baggy winkle is essentially a length of rope with short lengths of frayed rope woven along its length. This was originally used by seamen to provide chafe protection on-board a ship.
 |
| Bug-proof fit |
 |
| The finished product |
We are now sleeping soundly without that nagging buzzing sound around our ears at night.
Branko
Monday, 10 June 2013
Making Plastic Windows Clear Again
H2OBO has a pilot house and large plastic deadlights through which we look to steer from our inside helm station. During the refit, I installed 1/2" thick polycarbonate plastic (Lexan is an example of a brand), rather than acrylic (Plexiglass), into the openings for its shatter resistance. Unfortunately, polycarbonate is less UV resistant and softer than acrylic, so with time it will become less transparent, more scratched and need to be polished. With hindsight, I should have installed 1/2" acrylic, which would have been sufficiently strong enough to do the job and require less maintenance.
It is a tedious job, but I have done it a few times now with excellent results. What you will need to do is to wet-sand the plastic first and then polish it. The opacity is caused by three things: scratches, oxidation, and crazing. Crazing looks like cracks in the plastic and goes a little deeper than oxidation. Deep scratches might be difficult to remove, but they can be made less obvious in any case. Depending on the severity of the problem you will want to start with the correct grit of sandpaper. For light crazing, I started with 600 or 800 grit paper, which I bought at an auto-body repair supply store. If there is just oxidation, you can try starting with 1000, 1200 or 1500 grit. During each course of sanding, you want to keep things wet, not press too hard and sand until the plastic is uniformly sanded. Don't move the sander around too quickly; otherwise, you will have undesirable swirling patterns. Check that there are no foreign objects under the pad that might scratch the plastic. Wipe off the residue with a soft cloth and water often to check on your progress.
I use a quarter-sheet electric sander and then a random orbital grinder with a soft, sponge pad set at a medium speed. It is important NOT to heat the plastic as this will cause further optical distortion, so during the sanding process I use a spray bottle with water in it to keep the plastic wet while sanding, and during the polishing process the lower speed on the grinder.
Once you are ready to move on to the next grit, clean the surface with the cloth and fresh water. The sandpaper regime I use is the following: 800, 1000, 1200, 1500, 2000, and 2500 grit. I have not been able to find any finer sandpaper than 2500. After the sanding is complete, clean the plastic and get ready to polish.
You will need to get a plastic polishing compound like Meguires or Novus. I have used both with similar results. Usually they come in kits with two levels of grit: a scratch remover and a polisher - use both for optimal results. My Porter Cable Random Orbital grinder outfitted with a soft sponge serves well, but I have also used a lambskin polishing pad.successfully. Carefully follow the instructions for the polishing compound and you will get good results. Afterwards, clean off the residue with a soft, clean cloth, and you will have beautifully transparent windows.
The clarity of the plastic can now be maintained with just occasional polishing. If you neglect to do anything for too long, like during winter lay-up, sanding will be required again, albeit starting with a finer grit than the first time. I am going to try applying a polyester film that is used to protect the interior of homes from UV damage. This product is meant to be applied on the inside of glass windows, but I am going to try it on the outside to protect the plastic from UV and scratches. I will let you know how that turns out.
Thursday, 16 May 2013
Dinghy Dilemma
We left Toronto with a PVC, air-floor
inflatable dinghy that we purchased from Holland Marine Products. We
decided to get an air-floor model because we wanted to stow the
dinghy below decks when we made any long crossings. Hypalon versions
were too expensive and RIBs wouldn’t stow. The HMP model had all
the options and a comparably low price to brand-name models, and we
felt even better about buying it at the Toronto Boat Show and
receiving a further discount. It was made in China and was a model
popular with marine stores who wanted to brand their own dinghy, as
we saw along our travels towards Florida. It turned out to be of
very poor quality and a very big disappointment.
We barely used it the entire way down
the St. Lawrence River and down the east coast of Canada and the U.S.
Once we entered the ICW, it remained inflated and we towed it behind
H2OBO. Within a matter of weeks leaks in the form of small pinholes
began to appear in the pontoons. These were found by spraying soapy
water onto the pontoon and watching for the tell-tale bubbles. I
used the trusty patch kit that came with the boat and contained a
suspiciously large number of patches. The really troublesome holes
were the ones that appeared in the air floor. When your air floor
goes flat, you basically have an inner tube with a web floor –
it's useless.
The air floor had a tendency to part at
the seams, which made for a difficult repair, especially with the
higher air pressure (12 psi compared to 3-4 in the pontoons) that is
required to make the floor rigid. By the end of our first winter in
the Bahamas, I had patched seven leaks, three of which were in the
air floor. As a side note, we met a couple in the Bahamas whose
brand-name, Hypalon, air-floor dinghy developed a leak in the floor.
After trying several times to repair it with the Hypalon repair kit,
they discovered that, while the pontoons were made of Hypalon, the
air floor was made of PVC.
I kept repairing that dinghy until I
was able to finally sell it for next to nothing in Almerimar, Spain,
where we spent the second winter. I had hoped to buy a used, Hypalon
RIB and found one at a consignment store in the marina complex. The
plan was to find one that was beat up and inexpensive that we could
use while we were in the Med and then sell or dispose of when we set
out on another ocean crossing. I tested for leaks in the pontoons
with my soapy water spray bottle and found none. I ignored the
abrasions underneath where the pontoons were bonded to the fiberglass
floor. I wish I hadn't.


The abrasions allowed a little bit of
water to enter that meant we had to bail out the boat once
or twice a day, especially if we didn't want our gear or provisions
to get wet. Hypalon repair kits are expensive and hard to find, so I
did a quick repair while still in Spain with the remaining patches
from the PVC kit that we still had. That worked well enough, but the
patches eventually released and it was time to fix things properly.
Once I removed the patches this spring in Dubrovnik, the leaks got a little worse.
A local chandlery had a Hypalon patch kit – purchased for close to
30 dollars – but the patch material that came included was too
small, and that turned out to be a waste of money.
After a little research on the
internet, I had read that repairs were successfully carried out with polyurethane bonding adhesives like 3M 5300 or Sikaflex 291, so I decided to give it a try.
Note that these are high-strength adhesives and not merely sealants
like 3M 5200. This is how I went about it and how it turned out.


Every marina has a lot of scrap lying
around, so I found an old dinghy and got permission to salvage large
pieces of the pontoons. In this case, it was a PVC dinghy, but that
didn't matter since I wasn't using an adhesive that was specific to
PVC or hypalon. After washing the patching material and the part of
our dinghy to be patched with detergent, I cut patches to fit,
allowing a large radius on the corners to keep them from becoming
dog-eared. I needed three patches to entirely cover the abraded
areas with a generous overlap. Then I sanded the areas that were to
be bonded with coarse sandpaper. I was now ready to apply the
adhesive.
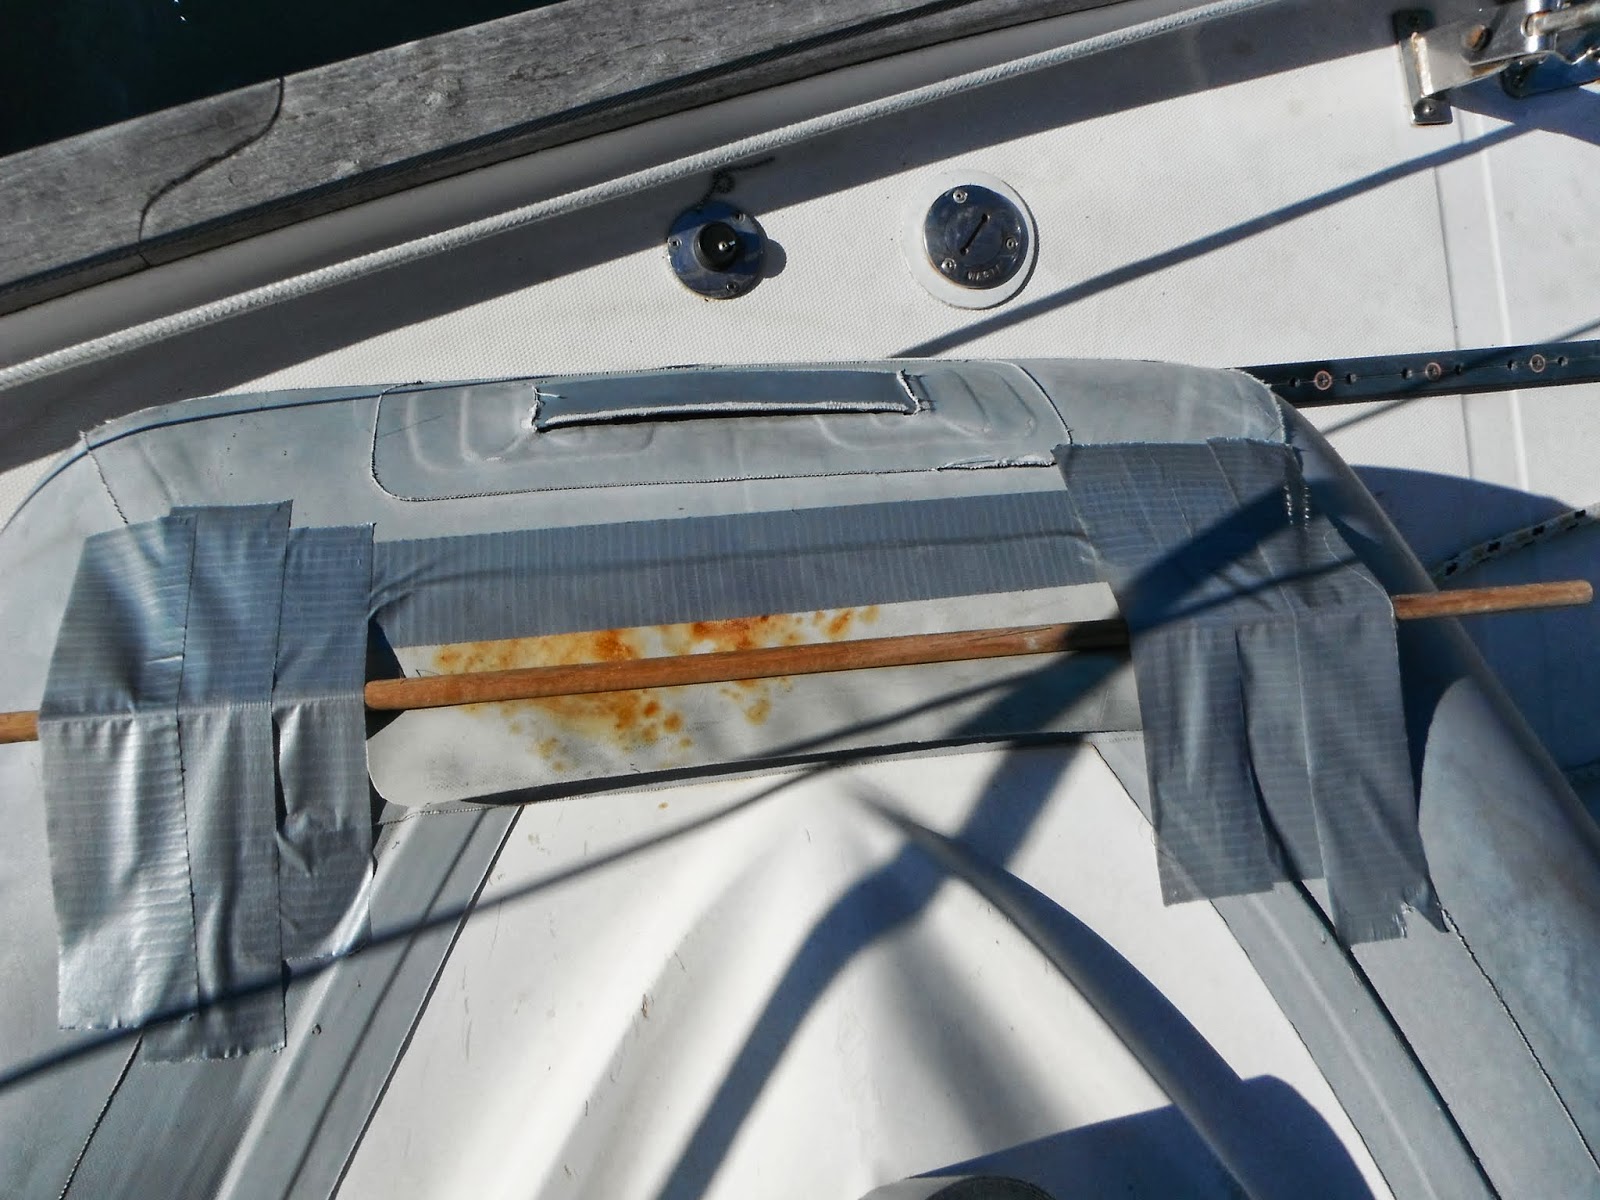
The gluing would have to be done in two
stages because there is a ridge where the pontoons are bonded to the
fiberglass bottom. I wanted to ensure that the patch was pressed
into this ridge; otherwise, I would again have a leak. We used
wooden dowels, duct tape and weights to accomplish this. I had on
hand Sikaflex 292i for the job. It became tack-free in 40 minutes,
which was ample time to spread the stuff onto the areas of the dinghy
that would receive the patches. I traced an outline of the patches
before hand so that I would know where to apply the Sikaflex. I used
the dowel to press the patch in behind the ridge and used to tape and
the weights to keep it in place.


 After a couple of hours, I checked the
bonding strength of the patches with a gentle tug on a corner and
discovered that I could proceed with the final stage. This time I
didn't need to use the dowels and just used the duct tape to hold
down the patches. When applying the patches, I ensured that they
were pressed flat with no air bubbles underneath and that a little
bit of adhesive squished out around the edges.
After a couple of hours, I checked the
bonding strength of the patches with a gentle tug on a corner and
discovered that I could proceed with the final stage. This time I
didn't need to use the dowels and just used the duct tape to hold
down the patches. When applying the patches, I ensured that they
were pressed flat with no air bubbles underneath and that a little
bit of adhesive squished out around the edges.
After another couple of hours, I was
able to carefully remove the duct tape and apply the finishing
touches. Our dinghy carries a 15 hp engine, so it can travel fast.
At speed, hydraulic pressure will tend to peel away a patch by
working on the leading edge. I tried to mitigate this by fairing the
leading edge of the patches with a tiny bead of caulking and a small
spreading tool. I don't actually know for sure if this will make any
difference, but I think the principle is sound.


The patches are stained with rust from sitting in the boatyard but they look robust. I will let you know how successful the repair is in the long run.
Branko
Subscribe to:
Posts (Atom)