
We left Toronto with a PVC, air-floor
inflatable dinghy that we purchased from Holland Marine Products. We
decided to get an air-floor model because we wanted to stow the
dinghy below decks when we made any long crossings. Hypalon versions
were too expensive and RIBs wouldn’t stow. The HMP model had all
the options and a comparably low price to brand-name models, and we
felt even better about buying it at the Toronto Boat Show and
receiving a further discount. It was made in China and was a model
popular with marine stores who wanted to brand their own dinghy, as
we saw along our travels towards Florida. It turned out to be of
very poor quality and a very big disappointment.
We barely used it the entire way down
the St. Lawrence River and down the east coast of Canada and the U.S.
Once we entered the ICW, it remained inflated and we towed it behind
H2OBO. Within a matter of weeks leaks in the form of small pinholes
began to appear in the pontoons. These were found by spraying soapy
water onto the pontoon and watching for the tell-tale bubbles. I
used the trusty patch kit that came with the boat and contained a
suspiciously large number of patches. The really troublesome holes
were the ones that appeared in the air floor. When your air floor
goes flat, you basically have an inner tube with a web floor –
it's useless.
The air floor had a tendency to part at
the seams, which made for a difficult repair, especially with the
higher air pressure (12 psi compared to 3-4 in the pontoons) that is
required to make the floor rigid. By the end of our first winter in
the Bahamas, I had patched seven leaks, three of which were in the
air floor. As a side note, we met a couple in the Bahamas whose
brand-name, Hypalon, air-floor dinghy developed a leak in the floor.
After trying several times to repair it with the Hypalon repair kit,
they discovered that, while the pontoons were made of Hypalon, the
air floor was made of PVC.
I kept repairing that dinghy until I
was able to finally sell it for next to nothing in Almerimar, Spain,
where we spent the second winter. I had hoped to buy a used, Hypalon
RIB and found one at a consignment store in the marina complex. The
plan was to find one that was beat up and inexpensive that we could
use while we were in the Med and then sell or dispose of when we set
out on another ocean crossing. I tested for leaks in the pontoons
with my soapy water spray bottle and found none. I ignored the
abrasions underneath where the pontoons were bonded to the fiberglass
floor. I wish I hadn't.


The abrasions allowed a little bit of
water to enter that meant we had to bail out the boat once
or twice a day, especially if we didn't want our gear or provisions
to get wet. Hypalon repair kits are expensive and hard to find, so I
did a quick repair while still in Spain with the remaining patches
from the PVC kit that we still had. That worked well enough, but the
patches eventually released and it was time to fix things properly.
Once I removed the patches this spring in Dubrovnik, the leaks got a little worse.
A local chandlery had a Hypalon patch kit – purchased for close to
30 dollars – but the patch material that came included was too
small, and that turned out to be a waste of money.
After a little research on the
internet, I had read that repairs were successfully carried out with polyurethane bonding adhesives like 3M 5300 or Sikaflex 291, so I decided to give it a try.
Note that these are high-strength adhesives and not merely sealants
like 3M 5200. This is how I went about it and how it turned out.


Every marina has a lot of scrap lying
around, so I found an old dinghy and got permission to salvage large
pieces of the pontoons. In this case, it was a PVC dinghy, but that
didn't matter since I wasn't using an adhesive that was specific to
PVC or hypalon. After washing the patching material and the part of
our dinghy to be patched with detergent, I cut patches to fit,
allowing a large radius on the corners to keep them from becoming
dog-eared. I needed three patches to entirely cover the abraded
areas with a generous overlap. Then I sanded the areas that were to
be bonded with coarse sandpaper. I was now ready to apply the
adhesive.
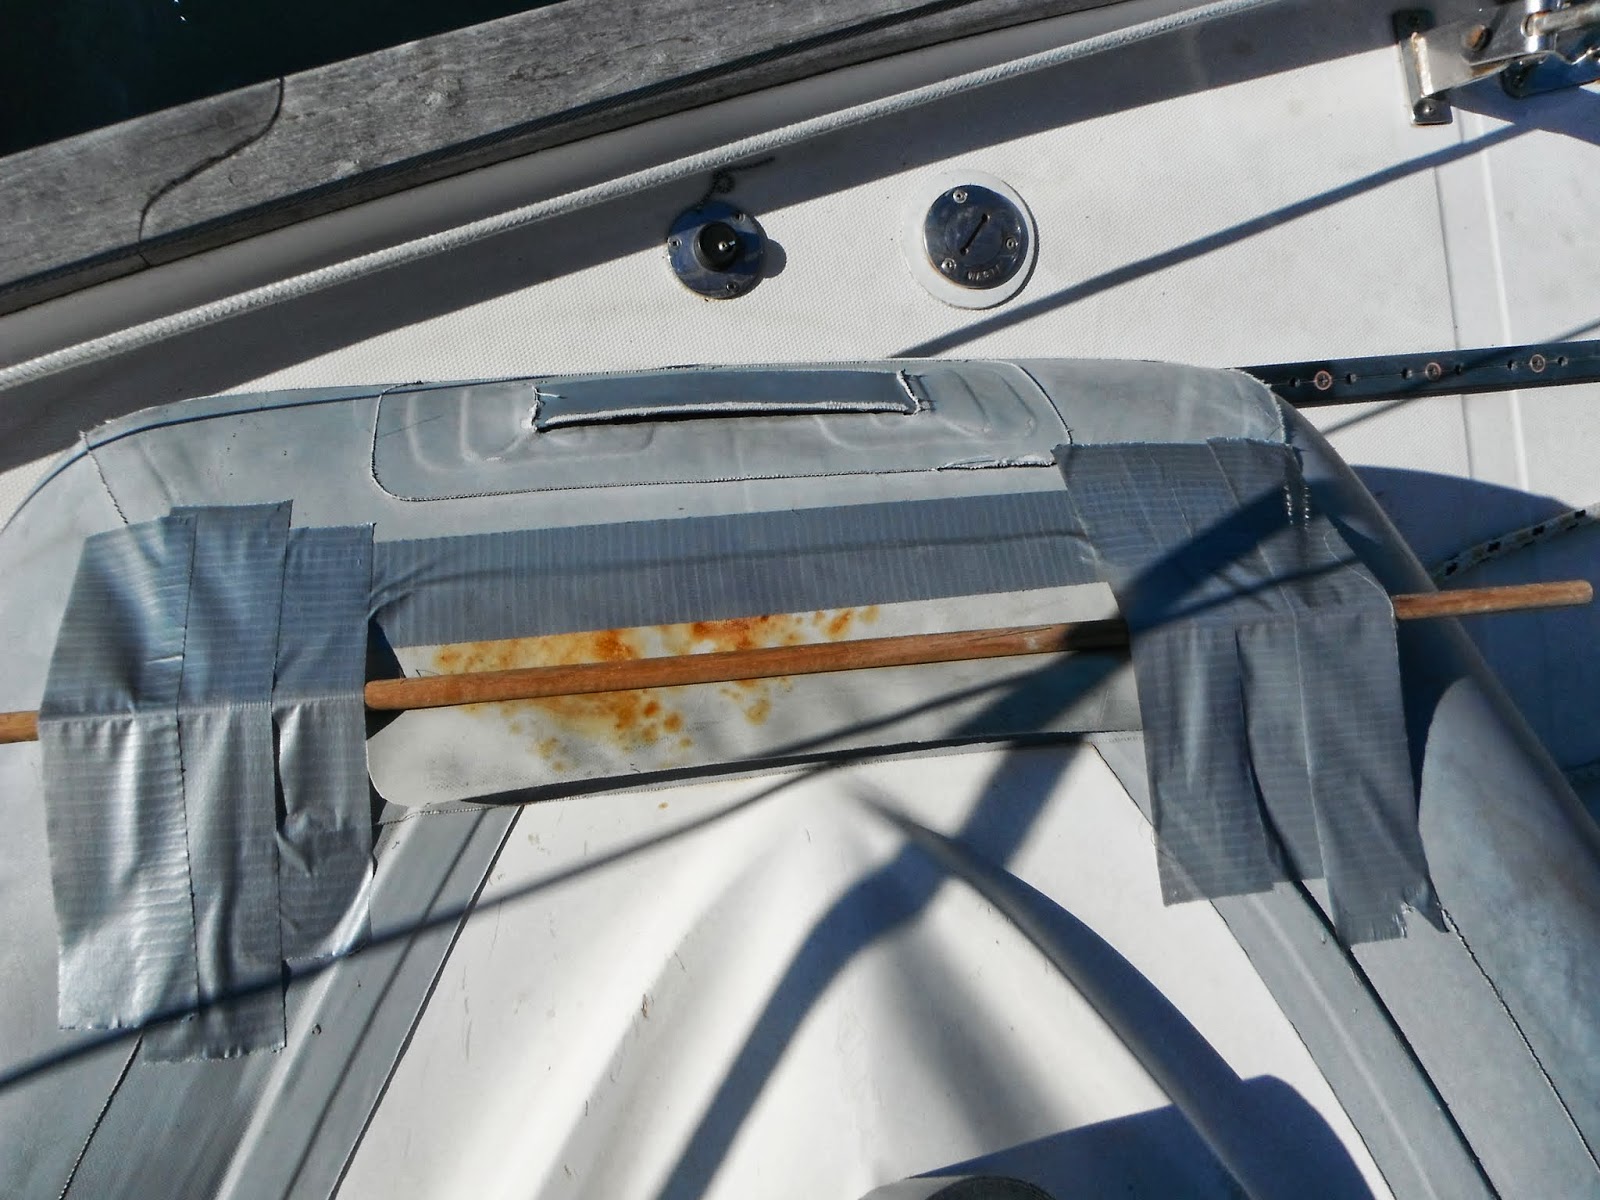
The gluing would have to be done in two
stages because there is a ridge where the pontoons are bonded to the
fiberglass bottom. I wanted to ensure that the patch was pressed
into this ridge; otherwise, I would again have a leak. We used
wooden dowels, duct tape and weights to accomplish this. I had on
hand Sikaflex 292i for the job. It became tack-free in 40 minutes,
which was ample time to spread the stuff onto the areas of the dinghy
that would receive the patches. I traced an outline of the patches
before hand so that I would know where to apply the Sikaflex. I used
the dowel to press the patch in behind the ridge and used to tape and
the weights to keep it in place.


 After a couple of hours, I checked the
bonding strength of the patches with a gentle tug on a corner and
discovered that I could proceed with the final stage. This time I
didn't need to use the dowels and just used the duct tape to hold
down the patches. When applying the patches, I ensured that they
were pressed flat with no air bubbles underneath and that a little
bit of adhesive squished out around the edges.
After a couple of hours, I checked the
bonding strength of the patches with a gentle tug on a corner and
discovered that I could proceed with the final stage. This time I
didn't need to use the dowels and just used the duct tape to hold
down the patches. When applying the patches, I ensured that they
were pressed flat with no air bubbles underneath and that a little
bit of adhesive squished out around the edges.
After another couple of hours, I was
able to carefully remove the duct tape and apply the finishing
touches. Our dinghy carries a 15 hp engine, so it can travel fast.
At speed, hydraulic pressure will tend to peel away a patch by
working on the leading edge. I tried to mitigate this by fairing the
leading edge of the patches with a tiny bead of caulking and a small
spreading tool. I don't actually know for sure if this will make any
difference, but I think the principle is sound.


The patches are stained with rust from sitting in the boatyard but they look robust. I will let you know how successful the repair is in the long run.
Branko
No comments:
Post a Comment